Introduction
Most people assume a home theatre needs its own dedicated room — a dark basement with blackout walls, tiered seating, and zero natural light. And while that is the dream for many, it is simply not the reality for most homes in Bangalore. Between compact 2BHK apartments in Electronic City and open-plan living rooms in villas across Whitefield and Sarjapur Road, carving out a separate cinema room is not an option for the majority of homeowners.
The good news? Your living room is already halfway there.
With the right combination of display technology, audio setup, lighting design, seating arrangement, and smart home automation, your living room can deliver a genuinely immersive cinema experience — one that works as a stylish family gathering space during the day and switches to a private movie haven at night. No construction required.
This guide walks you through every step of the transformation: from understanding minimum room size requirements and choosing the right display, to designing your lighting, managing acoustics in a shared living space, and integrating smart home automation that makes the whole experience feel effortless every single time.
Key Takeaways
| 💡Your living room can become a fully functional home theatre without structural changes or a dedicated room. 💡Minimum room size for a basic 5.1 setup is 12 x 10 ft; a living room of 15 x 12 ft or more works well for mid-range systems. 💡Seating arrangement, display position, and lighting control matter as much as the AV equipment itself. 💡A soundbar with subwoofer suits most apartments; 5.1 surround is ideal for medium rooms; 7.1 or Dolby Atmos suits larger independent homes. 💡Blackout curtains, dark accent walls, and layered dimmable lighting dramatically improve the cinema feel — often before any AV spend. 💡Multi-purpose design is the key: the right setup lets the space feel like a stylish living room by day and a cinema at night. 💡Smart home automation — one-touch Movie Mode, voice control, motorized curtains — is what separates a good setup from an exceptional one. 💡Professional installation and AV calibration ensure your system performs as well as it looks. 💡Plan smart home wiring and automation provisions during renovation — retrofitting costs significantly more. 💡Yes We Technologies offers end-to-end home theatre setup and smart automation services across Bangalore. |
Can Your Living Room Really Become a Home Theatre?
Short answer: absolutely. Long answer: it depends on how thoughtfully you approach it.
There is a meaningful difference between a dedicated home cinema and a living room theatre setup. A dedicated cinema is purpose-built — acoustically treated walls, no windows, tiered seating, and permanent installation throughout. A living room theatre is more practical: a space that functions beautifully as both a gathering room and an entertainment hub, with the right elements in place to make movie nights genuinely cinematic.
For most Bangalore homeowners — especially those in apartment communities across Koramangala, Indiranagar, Hebbal, and Electronic City — the living room theatre approach is not just a compromise. When designed well, it is actually the smarter choice. You get a space that earns its square footage every single day, not just on weekends.
What separates a living room theatre from just a big TV on a wall is a combination of five elements working together: the right display for your room’s light conditions, an audio system matched to your room’s dimensions, seating arranged for clean sightlines, lighting that shifts from social to cinematic on command, and smart home integration that ties everything together seamlessly. This guide covers all five.
Minimum Room Size for a Living Room Home Theatre
Before you decide on a projector, a screen size, or a speaker configuration, you need to understand what your room can actually support. Room size determines screen size, speaker placement, viewing distance, and how hard your audio system will have to work to fill the space. Getting this wrong is the single most common and most expensive mistake people make when setting up a living room theatre.
The Minimum Dimensions You Need
The absolute minimum recommended room size for a home theatre is 12 ft x 10 ft with a ceiling height of at least 8 ft. In a living room context, where you are also accommodating furniture, walkways, and multi-purpose use, a room of 15 ft x 12 ft gives you considerably more flexibility and comfort.
| Setup Type | Minimum Room Size | Ideal Room Size | Ceiling Height |
|---|---|---|---|
| Soundbar / 2.1 | 10 x 10 ft | 12 x 12 ft | 8 ft |
| 5.1 Surround | 12 x 10 ft | 15 x 12 ft | 8 ft |
| 7.1 Surround | 15 x 15 ft | 18 x 20 ft | 9 ft |
| Dolby Atmos 7.2.4 | 20 x 20 ft | 20 x 25 ft+ | 9 to 10 ft |
The Viewing Distance Formula
Screen size and seating distance are directly linked. Use this simple formula to find your optimal seating position:
| Optimal viewing distance = Screen diagonal (inches) x 1.2 to 1.575-inch TV: 90 to 112 inches (7.5 to 9.5 ft) optimal seating distance 100-inch projector screen: 120 to 150 inches (10 to 12.5 ft) optimal distance 120-inch screen: 144 to 180 inches (12 to 15 ft) optimal distance |
This is why room length directly determines the maximum useful screen size. If your living room is 12 ft long and your sofa is 2 ft from the back wall, your usable viewing distance is approximately 10 ft — meaning a screen larger than roughly 100 inches will be too large for comfortable viewing from that position.
Speaker Placement Requirements
Room width is just as critical as length. Front left, centre, and right (LCR) speakers require a minimum of 8 to 10 ft of room width to be positioned correctly. Side surround speakers need at least 2 to 3 ft of clearance on each side of the seating area. Subwoofers perform best in rooms 12 ft or longer, where low frequencies have space to develop properly before reaching your ears.
What to Do If Your Living Room Is Smaller
A compact living room is not a dead end — it simply changes your equipment choices. Rooms smaller than 12 x 10 ft are best served by a quality soundbar with a wireless subwoofer and a 55 to 65 inch OLED or QLED TV. Short-throw and ultra-short-throw (UST) projectors are excellent options for rooms where standard throw distance will not work.
| 📍Bangalore Tip: A typical 2BHK living room in apartments across HSR Layout, Bellandur, or Domlur measures around 12 to 14 ft x 10 to 12 ft. A well-chosen 65-inch OLED TV with a quality 5.1 soundbar system will perform beautifully in this space — and is far more practical than a projector setup in a room with ambient light. |
Choosing the Right Display: TV or Projector for Your Living Room?
This decision shapes everything else — room arrangement, lighting requirements, budget allocation, and the overall aesthetic. Here is how to think through it clearly.
When a Large-Screen TV Wins?
For most living rooms, a high-quality large-screen TV is the right choice. TVs perform well in rooms with ambient light, require no throw distance, are always ready without warm-up time, and can be wall-mounted to look like a design feature. In a multi-purpose living room used for morning news, afternoon cricket, and evening movie nights, a TV’s always-on convenience is genuinely valuable.
For a home theatre-quality experience from your TV, look for:
- Screen size: minimum 55 inches; ideally 65 to 85 inches for most Bangalore living rooms
- Resolution: 4K UHD as a baseline
- HDR support: HDR10 or Dolby Vision — significantly improves contrast and colour depth
- Refresh rate: minimum 120Hz for smooth motion in action films and sports
- Panel technology: OLED for the best contrast in darker rooms; QLED or Mini-LED for bright rooms
- Low blue light and flicker-free certification: important for long evening viewing sessions
| TV Technology | Best For | Key Strength |
|---|---|---|
| OLED | Dedicated evening viewing, darker rooms | Perfect blacks, infinite contrast ratio |
| QLED | Bright living rooms, daytime viewing | High brightness, vivid and accurate colours |
| Mini-LED | All-purpose balanced performance | High contrast combined with high brightness |
| Full HD LED | Budget setups, smaller rooms | Affordable and widely available in India |
When a Projector Wins?
Projectors make more sense when screen size is the priority and you have meaningful control over ambient light. A 4K projector with a 100 to 120 inch motorized screen in a room where you can draw blackout curtains creates an experience no TV can match for pure visual immersion. If your living room gets strong natural light during the day but can be properly darkened in the evenings, a projector is an excellent choice.
Short-throw and ultra-short-throw (UST) projectors are particularly well suited for living rooms with limited depth. A UST projector placed 15 to 30 cm from the wall can project an 80 to 120 inch image without requiring the 8 to 12 ft of throw distance that traditional projectors need.
- Laser projectors: best for rooms with some ambient light — high brightness, very long lamp life, minimal maintenance
- Smart projectors with Android TV: built-in streaming, no separate media device required
- 4K UST projectors: a large image from a small footprint — ideal for living rooms with limited depth
TV Placement: Wall Mount vs TV Unit
Wall mounting is almost always preferable for a home theatre living room setup. It creates a cleaner aesthetic, allows optimal height positioning, and frees up floor space. The centre of your TV screen should sit at approximately seated eye level — around 42 to 48 inches from the floor for standard sofa heights. Mounting above a fireplace or high cabinet typically places the screen too high for comfortable extended viewing.
Audio Setup: What Sound System Actually Works in a Living Room?
If you removed the visual component entirely, a great audio system would still make a film feel immersive. Sound is what your body responds to physically — the deep rumble of an explosion, the subtle crunch of footsteps on gravel, the enveloping width of a concert hall. Getting audio right is the most important single decision in a living room theatre setup.
Soundbar Plus Subwoofer: The Right Starting Point for Apartments
For compact living rooms, apartments, and those who prioritise a clean aesthetic, a quality soundbar paired with a wireless subwoofer delivers genuinely impressive performance. Modern Dolby Atmos soundbars with dedicated height drivers create a convincing sense of three-dimensional sound in rooms that cannot physically accommodate ceiling speakers. For apartments across Bangalore where wall and ceiling modifications are restricted, this is the most practical and most popular choice.
5.1 Surround Sound: The Living Room Standard
If your living room is 12 x 10 ft or larger, a 5.1 channel surround system is the step change that makes movie nights genuinely different. Front left, centre, and right speakers, two side surrounds, and a dedicated subwoofer — voices anchor to the screen through the centre channel, sound effects move around you, and music fills the room in a way no soundbar can replicate.
For speaker placement in a 5.1 living room setup:
- Front L/R speakers: positioned at 22 to 30 degrees off-axis from the primary seating position
- Centre channel: directly above or below the TV, angled toward the main listening position
- Surround speakers: at ear level or slightly above, at 90 to 110 degrees from the primary seat
- Subwoofer: in a front corner of the room for best bass response — experiment before finalising position
7.1 and Dolby Atmos: For Larger Independent Homes
If you are in an independent home or villa in Whitefield, Sarjapur Road, or Hebbal with a living room of 18 x 15 ft or more, a 7.1 or Dolby Atmos configuration becomes worth considering. Dolby Atmos adds height channels — through in-ceiling speakers or upward-firing Atmos modules — creating the sense that sound moves in three-dimensional space above and around you. This is where professional planning becomes especially important, as speaker placement and AV receiver calibration significantly determine the result.
| Audio Setup | Best Room Size | Key Benefit |
|---|---|---|
| Soundbar 2.0 to 3.1 | Under 12 x 10 ft | Clean look, easy install, Atmos-capable |
| 5.1 Surround | 12 x 10 ft to 18 x 14 ft | True surround, voice clarity, full immersion |
| 7.1 Surround | 18 x 14 ft to 20 x 18 ft | Wider soundstage, better rear placement |
| Dolby Atmos 7.2.4 | 20 x 18 ft and above | 3D height audio, overhead sound channels |
AV Receiver vs Soundbar: Which Suits Your Living Room?
An AV receiver is the brain of a full surround system — it decodes audio formats, powers multiple speakers, and manages all HDMI inputs. If you are running a 5.1 or larger speaker configuration, a receiver is essential. When choosing a receiver for a living room theatre, prioritise: Dolby Atmos and DTS:X decoding, HDMI 2.1 inputs for 4K passthrough, and room correction software such as Audyssey MultEQ or Yamaha YPAO.
Living Room Seating: Design, Comfort, and Layout
The best audio and visual system in the world will not make you want to stay on the sofa if the seating is uncomfortable or positioned incorrectly. Seating in a living room theatre serves two masters: it needs to feel like proper living room furniture during the day and perform like theatre seating in the evening.
Seating by Room Size and Configuration
Small living rooms (under 150 sq ft): An L-shaped sectional sofa is the most space-efficient choice. It provides maximum seating without overwhelming the room. Look for sofas with clean, low profiles — high backs block sightlines for anyone not sitting directly centre-facing the screen.
Medium living rooms (150 to 250 sq ft): A 3-seater sofa with two matching accent chairs gives flexible seating for four to six people while keeping the room feeling open. Ottomans that slide under the coffee table double as extra seating for guests and disappear when not needed.
Large living rooms (250 sq ft and above): A second row becomes genuinely possible. A low-profile loveseat on a slightly raised platform behind the primary seating creates tiered cinema-style viewing. Individual recliners with built-in cup holders and USB charging are a premium option increasingly popular in Bangalore villa living rooms.
Seating Arrangement Rules That Make a Real Difference
- Every seat must have a direct, unobstructed sightline to the screen
- Leave at least 24 inches of walking clearance behind the back row of seating
- Primary seating should face the screen wall squarely — angled seating creates neck strain over two hours
- Maintain the viewing distance formula: screen diagonal x 1.2 to 1.5 = minimum viewing distance in inches
- Avoid placing seating directly against the back wall — this positions listeners too close to rear speakers
Multi-Purpose Furniture That Works for Both Worlds
Because your living room theatre must also function as a living room, furniture choices matter beyond comfort alone. Lift-top coffee tables provide an elevated snack surface during movie night and collapse to standard height for everyday use. Media consoles with enclosed storage hide AV receivers, gaming consoles, and streaming devices when the system is off. Material and colour choices also influence the experience: dark tones — charcoal grey, navy, forest green, warm espresso brown — are both currently on-trend in Bangalore interiors and acoustically beneficial, as denser darker fabrics absorb more sound than bright lightweight ones.
Lighting Design: The Fastest Way to Transform Any Living Room
You could upgrade your TV, add a soundbar, and rearrange your sofa — but nothing changes the feel of a living room theatre faster or more affordably than getting the lighting right. The right lighting makes even a modest AV system feel significantly more immersive. The wrong lighting undermines an expensive one.
Step 1: Control Natural Light
Ambient light is the enemy of screen contrast. Every lumen of natural light hitting your TV washes out the dark areas of the image — reducing the perceived contrast ratio and making even an expensive OLED look far worse than its specifications suggest.
The solution is blackout curtains or heavy layered drapes. For a living room that needs to feel open and bright during the day, a double-layer curtain system works well: a sheer inner layer for daytime light and a blackout outer layer for evening viewing. Motorized curtain systems can be programmed to close automatically when Movie Mode activates — Yes We Technologies installs these throughout Bangalore homes.
Step 2: Replace Overhead Glare with Layered Ambient Lighting
Harsh overhead ceiling lights are one of the main reasons living rooms feel nothing like cinemas. The fix is layering: replace direct overhead illumination with a combination of floor lamps, wall sconces, and LED strips that provide soft, diffused light from multiple directions at lower intensity.
- Floor lamps positioned behind the seating area provide warm fill light without shining toward the screen
- Wall sconces flanking the screen create a balanced visual frame without adding glare to the display
- Recessed spotlights with dimmers offer flexible control — bright for everyday use, dim for cinema viewing
Step 3: Bias Lighting Behind the Screen
Bias lighting is a soft backlight placed directly behind your TV or projector screen, illuminating the wall behind it with a warm or neutral glow. It reduces eye strain during long viewing sessions, increases perceived contrast, and gives the setup a premium finished look. Smart LED strips in warm white or neutral white placed behind the TV panel — dimmable and tunable, integrated with your home automation system — are one of the highest-value, lowest-cost upgrades available in any living room theatre.
Step 4: Smart Lighting Scenes
Dimmable and tunable smart lighting allows you to programme the right state for every use of the room. A Movie Mode scene might dim all lights to 5 to 10 percent, close motorized curtains, shift bias lighting to warm 2700K, and power on the AV system — from a single voice command or a tap on your phone. A Social Mode brings lights to 70 percent warm white for family evenings. A Work Mode shifts to cool 5000K daylight-balanced lighting. This is one of the areas where smart home automation delivers genuinely transformative results that conventional switches simply cannot provide.
The Dark Wall Effect
Painting the wall behind your screen a dark tone — deep charcoal, slate grey, navy blue, or espresso brown — is one of the most impactful changes you can make to any living room theatre. A single dark feature wall absorbs stray light, reduces visual distraction around the screen edges, and creates a natural focal point that gives the room an immediate cinematic quality. You do not need to repaint the entire room to see a significant difference. For rental apartments in Bangalore where repainting is not permitted, a large dark art print or fabric panel behind the display achieves a similar effect without permanent wall changes.
Curtains, Flooring, and Room Acoustics
One of the most underappreciated aspects of a living room theatre is how the room’s physical surfaces affect what you actually hear. Hard floors, bare walls, and large windows create reflections that blur the stereo image, muddy dialogue, and make bass sound boomy rather than tight. The good news is that most living rooms already contain the elements needed to address this — they just need to be used correctly.
Curtains as Acoustic Treatment
Heavy curtains do double duty in a living room theatre: they control natural light and absorb high-frequency sound reflections from the wall behind them. Floor-to-ceiling blackout curtains on the window wall can meaningfully reduce echo and flutter, especially in rooms with hard tile or marble flooring — which is the reality in most Bangalore apartments. This is one of the reasons that cinema-inspired living rooms so often feature generous, dramatic curtain arrangements. They look spectacular and they genuinely improve the sound.
Rugs: The Most Cost-Effective Acoustic Upgrade Available
If your living room has tile or hardwood flooring — as most Bangalore apartments do — a large area rug positioned under and around the primary seating area will noticeably improve the sound quality of any audio system. Hard floors cause early reflections between the speakers and your ears that blur stereo imaging and add an uncomfortable brightness to the sound. A thick rug absorbs these reflections, tightening the bass, improving vocal clarity, and making the overall sound feel more natural and controlled. For a living room theatre, a rug that extends at least 12 to 18 inches beyond the front legs of your sofa on all sides delivers the most benefit.
What About Acoustic Panels?
Acoustic panels are not mandatory for a living room theatre — especially if you have good curtains, a thick rug, soft upholstered seating, and bookshelves with books, which act as natural sound diffusers. However, if your living room has many hard surfaces and your audio system sounds bright, echoey, or lacks bass definition, targeted panels on primary reflection points can make a significant and immediate difference. Fabric-wrapped panels in custom colours and shapes can be designed to look like wall art — Yes We Technologies offers acoustic treatment solutions designed to integrate visually into the living room environment.
Acoustic Treatment vs Soundproofing: Understanding the Difference
Acoustic treatment improves the sound quality inside the room — reducing reflections, echo, and resonance so the audio system performs better. Soundproofing prevents sound from leaving the room or entering from outside. They are different problems with very different solutions and price points. For most living room theatre setups, acoustic treatment is what you need. True soundproofing is primarily relevant for dedicated cinema rooms or situations where sound isolation from neighbours in an apartment building is a serious concern.
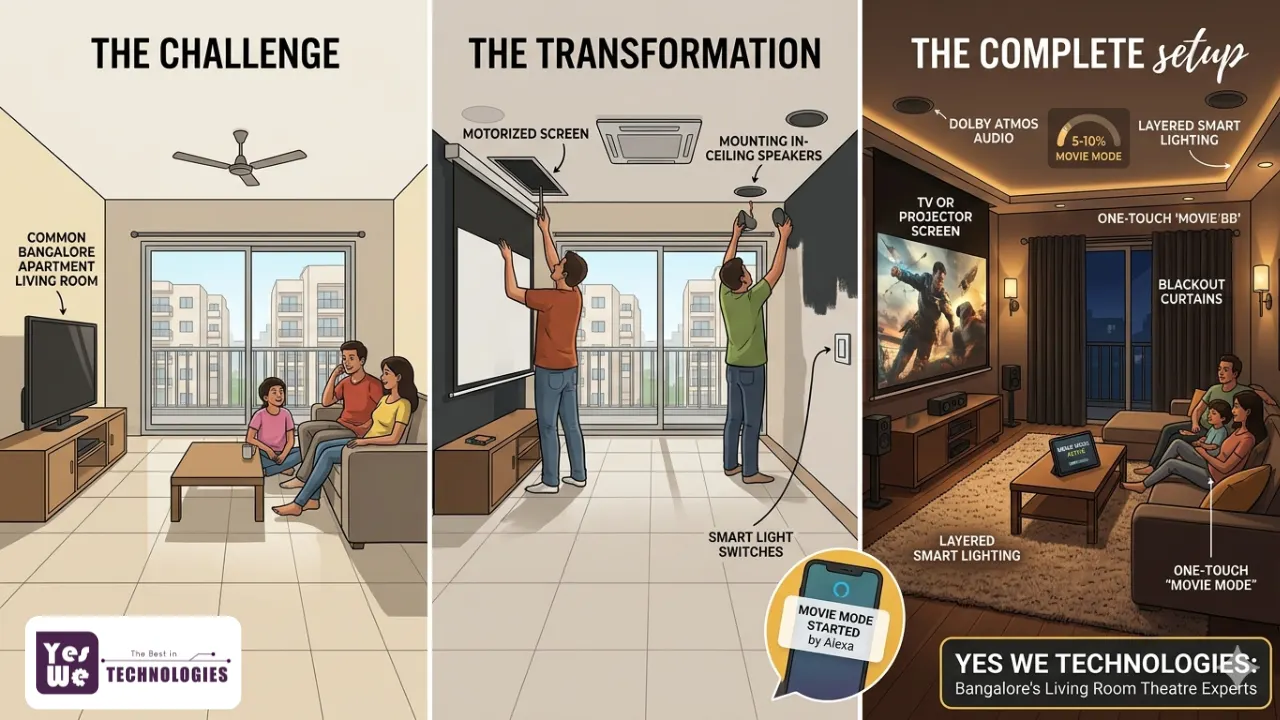
Smart Home Automation: The Living Room Theatre Upgrade That Changes Everything
Everything covered so far — the display, the audio, the seating, the lighting, the acoustic environment — improves your living room theatre independently. Smart home automation is what ties all of it together into something genuinely seamless. It is the difference between a room with good equipment and a room that actually feels alive and responsive.
What Movie Mode Actually Means
Movie Mode is a single automation scene that simultaneously reconfigures your entire living room for cinema viewing. In a well-integrated smart home setup, triggering Movie Mode — through a voice command, a tap on your phone, or a button on your smart wall panel — does all of the following automatically:
- Dims all smart lights to your preset cinema level, typically 5 to 10 percent
- Closes motorized curtains or blinds to block ambient light from all windows
- Adjusts the air conditioning to your preferred viewing temperature
- Powers on the AV receiver and TV or projector with the correct input selected
- Lowers the motorized projector screen if applicable to your setup
- Activates bias lighting behind the display at the right warm tone
- Selects your preferred streaming platform or HDMI input
When the movie ends, a single End Movie command reverses all of it instantly. This is not a futuristic concept — Yes We Technologies installs exactly this kind of integrated setup in homes across Bangalore every week.
Voice Assistant Integration
Alexa, Google Home, and Siri are natural control interfaces for a living room theatre. Instead of managing multiple remotes and wall switches, a single voice command handles the entire environment. ‘Alexa, Movie Mode’ or ‘Hey Google, start movie night’ are genuinely practical daily commands when your home automation system is correctly configured. Voice control is also one of the most accessible features for elderly family members and young children who find app-based controls less intuitive.
Smart Touch Switches
Replacing conventional wall switches with smart touch switches is one of the most impactful aesthetic and functional upgrades in any living room theatre project. Glass-panel smart touch switches allow you to trigger scenes — Movie Mode, Relax Mode, Bright Mode — with a single touch. They also eliminate the visual clutter of multiple wall switches near the entrance, replacing what might otherwise be five or six separate switches with a single elegant panel.
HVAC Automation
Thermal comfort is a genuine part of the cinema experience. An overly warm living room is distracting during a film; an air conditioner that cycles on noisily during a quiet dialogue scene is worse. HVAC automation allows the AC to be set to a precise temperature automatically when Movie Mode activates and to power down quietly when the session ends. In Bangalore’s warm climate, this is a practical daily benefit across all seasons.
Plan Smart Home Automation Upfront
The most important piece of advice on smart integration: plan it during renovation, not after. Motorized curtain tracks need specific ceiling mounting provisions. In-wall smart switch wiring requires a dedicated neutral wire that most older Indian apartments do not have by default. Projector and screen mounting points need conduit runs for power and signal cables. Doing this work during an interior fit-out costs a fraction of what it costs to retrofit through finished walls and ceilings later. If you are renovating a home anywhere in Bangalore, Yes We Technologies can advise on the exact provisions to build in during construction.
Multi-Purpose Living Room Theatre: Making It Work for Everyday Life
The living room theatre that works best is one you barely notice when it is not in use. The equipment should feel integrated, not bolted on. The space should feel like a living room first and a cinema second.
Concealment and Clean Lines
- Wall-mounted TVs with integrated in-wall cable channels eliminate the most visually disruptive element of any AV setup — visible dangling cables
- Media consoles with enclosed storage keep AV receivers, gaming consoles, and streaming devices completely hidden when not in use
- Motorized projector screens retract into a ceiling cassette or wall housing when not in use — the room returns to looking like a normal living room instantly
- In-ceiling or in-wall speakers are virtually invisible when installed correctly and are one of the most elegant solutions for preserving the living room aesthetic
The Convertible Mindset
The best multi-purpose living room theatres use furniture and equipment that actively transforms the space rather than occupying it in a permanently fixed cinema state. A modular sofa that reconfigures for different group sizes. A coffee table with a lifting surface for snacks during viewing. Curtains that are sheer for daytime light and opaque for evening cinema. Lighting that shifts from warm social to cinematic darkness with a single command. The goal is a room where the transition from living room to home theatre takes under 30 seconds.
Creative Living Room Theatre Ideas for Different Spaces
There is no single right configuration for a living room home theatre. The best setup depends on your room’s shape, light conditions, how the space is used, and who uses it. Here are seven practical configurations that work well in real Bangalore homes.
1. The Minimalist Wall-Mounted Setup
A large OLED or QLED TV flush-mounted on the wall with all cables completely concealed in-wall, a slim Dolby Atmos soundbar positioned below, and a clean media unit at the base. This works best in apartments where a projector is not practical and a permanent cinema installation would feel out of place. It is the easiest configuration to execute cleanly, though smart lighting and automation still benefit significantly from professional setup.
2. The Projector-and-Pull-Down-Screen Setup
A ceiling-mounted 4K projector paired with a motorized pull-down screen on the main wall. When the screen is retracted, the wall looks entirely normal. When it is deployed, the room becomes a cinema. This is one of the most popular configurations in independent homes and villa living rooms across Whitefield, Sarjapur Road, and Bannerghatta Road, where ceiling heights comfortably accommodate ceiling mounting.
3. The Cosy Corner Theatre
In a compact living room or studio apartment, a single wall corner anchors the display — either a large TV or a short-throw projector — with seating arranged to face it. Two large armchairs or a small L-shaped sofa, a rug defining the viewing zone, and LED strip lighting behind the display complete the setup. This works especially well in 1BHK units in Electronic City, HSR Layout, BTM Layout, and Koramangala.
4. The Bookshelf Theatre
A projector ceiling-mounted with a motorized screen that rolls down in front of a floor-to-ceiling bookshelf. The bookshelf serves as both storage and a natural acoustic diffuser, and the screen covers it seamlessly during viewing. A clever solution for homes where the book or media collection is a design feature — no wall needs to be sacrificed to a permanent screen installation.
5. The Retro Cinema Living Room
Warm Edison bulb lighting, natural wood tones, classic floor-standing speakers, framed vintage film posters, and a deep velvet sectional sofa. A high-quality 4K projector or large OLED TV anchors the setup. This aesthetic is growing in popularity in independent homes and bungalows across Jayanagar, JP Nagar, and Banashankari, where homeowners want the theatre to feel like a room worth showing off even when nothing is playing.
6. The Family Multi-Purpose Theatre
A large sectional in a U or L configuration, a 75 to 85 inch wall-mounted TV, a 5.1 soundbar or compact surround system, and smart lighting that shifts between Family Evening mode and Movie Mode instantly. This is the configuration most Bangalore families with young children in gated apartment communities across Hebbal, Sarjapur Road, and Varthur end up choosing.
7. The Terrace or Balcony Extension
For independent homes and villas with a terrace or covered balcony, a portable projector and inflatable or fixed outdoor screen creates an entirely different kind of cinema experience. Open-air movie nights with outdoor seating, string lights, and the Bangalore night sky as the backdrop. This is increasingly popular in villa communities across Devanahalli, Kanakapura Road, and Hennur Road.
Step-by-Step Living Room Theatre Transformation Checklist
If you are ready to start, here is the practical sequence that saves the most money and avoids the most common mistakes:
- Measure your living room precisely — length, width, and ceiling height — and confirm screen size and viewing distance compatibility using the formula above.
- Decide on TV or projector based on your room’s ambient light conditions and how much you are prepared to invest in light control.
- Choose your audio configuration — soundbar, 5.1, or 7.1 — based on room size and whether your building allows wall or ceiling modifications for speaker installation.
- Arrange or select seating for clear sightlines and correct viewing distance, leaving proper walking clearance behind all rows.
- Install blackout curtains or motorized blinds on all windows that affect the viewing environment.
- Set up layered lighting — dimmers on existing overhead fixtures, LED strips behind the display, and floor lamps positioned behind the seating area.
- Add a large area rug under and around the primary seating area for acoustic improvement and visual grounding of the space.
- Plan and install cable management — in-wall conduit, surface cable channels, or wireless solutions depending on permanence and budget.
- Integrate smart home automation: smart switches, voice assistant setup, HVAC integration, motorized curtains, and programmed AV control scenes.
- Have the audio system professionally calibrated for your specific room dimensions and furniture layout — this step makes everything perform at its best.
Common Mistakes to Avoid When Setting Up a Living Room Theatre
These are the errors that consistently cost homeowners money and result in disappointment — and almost all of them are entirely avoidable with a small amount of planning at the start.
- Positioning the TV or screen on a wall that receives direct sunlight during your primary viewing hours — the single most common setup error and one of the most expensive to fix after the fact.
- Buying speakers without confirming the room is wide enough for correct placement — side surrounds placed too close to the listening position create an unnatural, suffocating sound image rather than genuine surround.
- Skipping the rug in a hard-floored room — this single addition has a more immediately audible impact on sound quality than most equipment upgrades at the same price point.
- Choosing furniture that blocks speaker positions or creates sightline obstructions for anyone not sitting in the exact centre position.
- Ignoring cable management entirely — visible cables are the single biggest visual element preventing a living room from feeling like a deliberately designed theatre space.
- Not planning for smart home automation upfront — adding motorized curtains or in-wall smart switches after walls are finished results in surface mounting, additional cost, and visible conduit runs.
- Spending the entire budget on AV equipment while leaving the room acoustically untreated and the lighting completely unchanged — the most common way to spend a large sum on a system that does not perform proportionally better.
Transform Your Living Room into a Cinema with Yes We Technologies: Bangalore’s Home Theatre Experts
Setting up a home theatre in your living room is about far more than buying the right TV or the loudest speakers. It is about understanding your room’s specific dimensions and light conditions, matching the audio and visual system to how you actually use the space, designing a lighting and acoustic environment that makes everything perform at its best, and integrating smart home automation that makes the whole experience feel effortless every single time you sit down to watch something.
Yes We Technologies is Bangalore’s trusted home theatre installation and smart home automation company, delivering end-to-end living room theatre solutions for apartments and independent homes across the city. From a budget-conscious smart TV and soundbar setup in a compact apartment in Electronic City to a premium 7.1 Dolby Atmos cinema room with motorized screens and full smart home automation in a villa in Whitefield — the team at Yes We Technologies designs, installs, and calibrates home theatre systems that are matched precisely to each home, each lifestyle, and each budget.
Here is what you get when you work with Yes We Technologies for your home theatre setup in Bangalore:
- Room-specific analysis before any equipment is recommended: acoustic assessment, ambient light evaluation, and display calibration based on your actual living room dimensions and conditions.
- Complete home theatre design: TV or projector selection and calibration, screen sizing, 5.1 or 7.1 or Dolby Atmos speaker configuration, and AV receiver setup for your specific room.
- Smart home automation integration: Movie Mode programming, voice control via Alexa and Google Home, motorized curtains and blinds, dimmable and tunable smart lighting, HVAC automation — all connected through a single unified app or voice command.
- Premium brand partnerships: Harman Kardon, JBL, Epson, Dolby, and Elite Screens — matched carefully to your room size, usage pattern, and budget.
- In-wall and in-ceiling speaker installation, professional cable management, and clean visual integration — so your living room looks like a designed space, not a technology showroom.
- Full smart home ecosystem integration: CCTV and security, networking, smart lighting, and automation systems all working together seamlessly.
- Post-installation support and Annual Maintenance Contracts: because your system should perform perfectly for years, not just on the day it is installed.
Whether you are starting with a Rs 75,000 soundbar and smart lighting upgrade in your Bangalore apartment or building a premium living room cinema with 7.1 Dolby Atmos, a motorized projector screen, and full smart home automation in your independent home, Yes We Technologies will design a solution tailored to your space, your family, and your budget.
| Contact Yes We Technologies today for a free living room home theatre consultation in Bangalore. ✅ Website: https://yeswe.in ✅ Phone: +91 9620555565 ✅ Email: enquiry@yeswe.in ✅ Address: 29, Satya Nivas, 2nd Cross, DLF Main Rd, Nyanappana Halli, Bengaluru, Karnataka 560076 ✅ Serving: Whitefield | Indiranagar | Koramangala | Sarjapur Road | Hebbal | Electronic City | Jayanagar | JP Nagar | HSR Layout | Bellandur | Domlur | Devanahalli | Hennur | Bannerghatta Road and all areas across Bangalore |
Frequently Asked Questions
1. What is the minimum room size for a living room home theatre?
The absolute minimum for a basic 5.1 surround setup is 12 x 10 ft with an 8 ft ceiling. For a comfortable living room home theatre that accommodates proper audio, seating, and viewing distance, 15 x 12 ft is the practical starting point. Smaller rooms can still deliver a strong experience with a quality Dolby Atmos soundbar and a 55 to 65 inch TV.
2. Is a projector or TV better for a living room home theatre?
It depends on your room’s light conditions and how the space is used day-to-day. A large-screen OLED or QLED TV is the better choice for rooms with ambient light and multi-purpose use — always ready, no throw distance required, performs in any lighting. A projector is better when screen size is the priority and you can properly control ambient light for evening viewing sessions.
3. How can I reduce echo and improve sound in my living room without acoustic panels?
The most effective low-cost improvements are: a large thick area rug under the seating area, heavy curtains on window walls, bookshelves filled with books along side walls, and soft upholstered furniture. Together these can noticeably tighten the bass, improve vocal clarity, and improve overall sound quality without any dedicated acoustic treatment products.
4. What is the ideal seating distance from a screen in a living room theatre?
Multiply the screen diagonal in inches by 1.2 to get the minimum comfortable viewing distance in inches, and by 1.5 to get the maximum. For a 75-inch TV the ideal range is 90 to 112 inches — 7.5 to 9.5 ft. For a 100-inch projector screen the range is 120 to 150 inches — 10 to 12.5 ft.
5. Can I set up a home theatre in a small apartment in Bangalore?
Yes, and many Bangalore residents in compact 1BHK and 2BHK apartments already have. The key is matching the system to the room: a 55 to 65 inch TV, a quality Dolby Atmos soundbar with a wireless subwoofer, blackout curtains, a thick area rug, and layered smart lighting will deliver a genuinely impressive cinema experience even in a room as small as 10 x 12 ft.
6. What is the difference between a soundbar and a 5.1 surround system?
A soundbar is a single elongated speaker unit that uses audio processing to simulate surround sound from one position. A 5.1 surround system uses physically separate speakers placed around the room — three at the front, two at the sides or rear, and a dedicated subwoofer. The 5.1 system delivers true positional audio, with a particularly noticeable difference in how voices stay anchored to the screen and how sound effects move around the listening space.
7. How does smart home automation improve the living room theatre experience?
Smart automation allows lighting, curtains, HVAC, and AV equipment to be controlled simultaneously through a single command. A Movie Mode scene can dim lights, close curtains, adjust the AC, and power on the AV system in one tap or one voice command. This removes the friction that causes most home theatre systems to be used less often than they should be, and ensures the room environment is always perfectly set up for viewing.
8. What is Movie Mode in a smart home theatre?
Movie Mode is a pre-programmed automation scene that reconfigures your entire living room for cinema viewing simultaneously. It activates light dimming, motorized curtain closure, air conditioning adjustment, and AV system power-on — all from a single voice command or button press. Yes We Technologies configures custom Movie Mode scenes for every home theatre installation across Bangalore.
9. What is the best paint colour for a living room home theatre?
For the wall behind your screen, deep dark tones work best: charcoal grey, slate, navy blue, deep forest green, or espresso brown. These tones absorb ambient light rather than reflecting it onto the screen surface and create a natural visual anchor for the display. Painting a single feature wall behind the TV achieves most of the benefit without requiring a full room repaint.
10. How much does it cost to set up a living room home theatre in Bangalore?
A well-executed living room home theatre in Bangalore ranges from approximately Rs 75,000 for an entry-level setup with a 65-inch TV, quality soundbar, and smart lighting, to Rs 5,00,000 or more for a premium configuration with a 4K laser projector, 7.1 surround system, motorized curtains, and full smart home automation. Most Bangalore homeowners investing in a quality living room theatre spend between Rs 1,50,000 and Rs 3,50,000. Contact Yes We Technologies for a free consultation and a customised quote for your specific home.
Additional Read: A detailed cost breakdown Home Theatre Setup Cost in Bangalore: The Complete 2026 Guide